
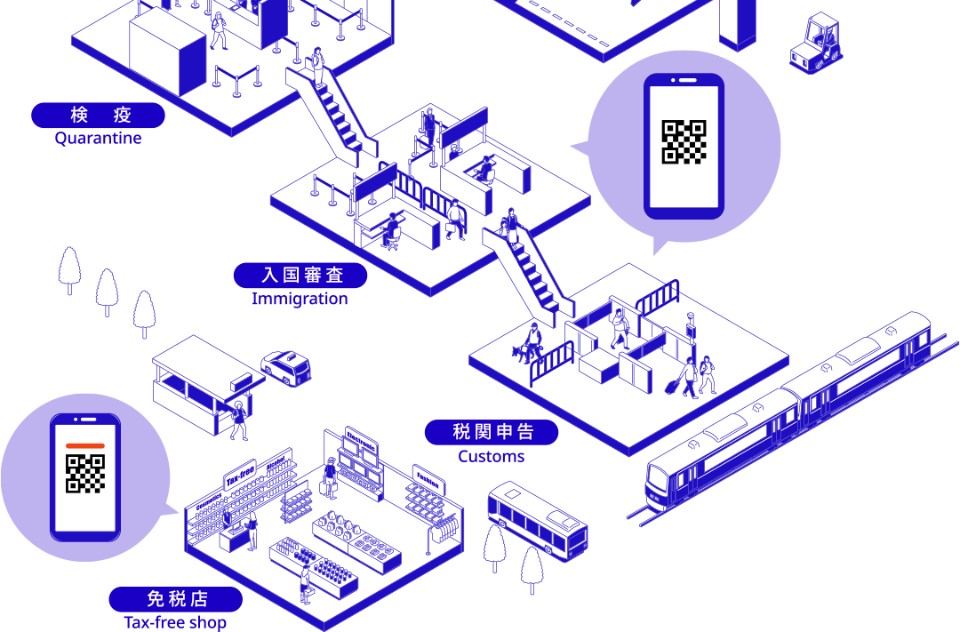
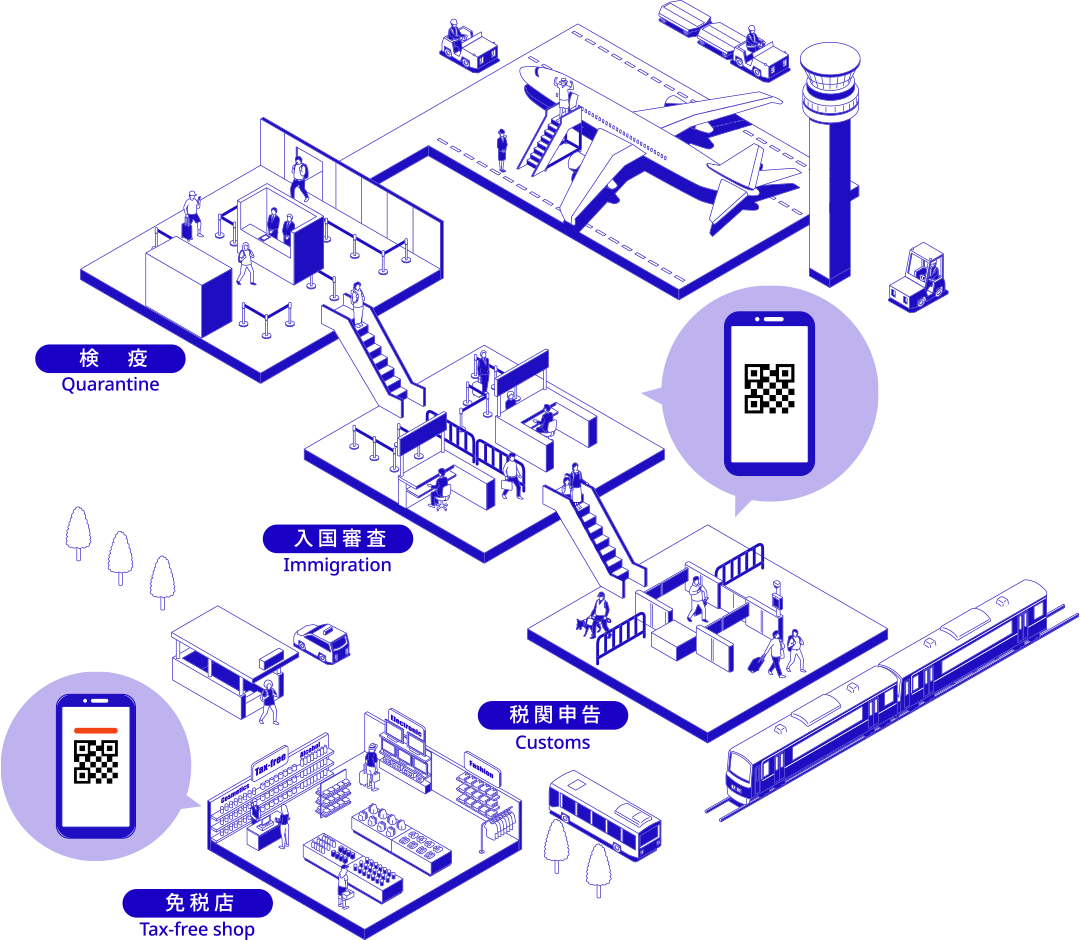
For those of you planning a trip to Japan, how is your preparation going? The Japanese government offers a free web service called "Visit Japan Web" where you can register the information required for quarantine (health status confirmation), immigration, and customs declaration before your departure. While it is not mandatory to use, it can help you skip filling out paper forms and may allow for smoother procedures at supported airports. In this article, we will explain how to register for "Visit Japan Web" using actual screenshots.
Information confirmed as of August 17, 2026
👀Click here for the official Visit Japan Web site
🚅Book your Shinkansen ticket with NAVITIME Travel! 👉 Click here
🛫Book your flight ticket with NAVITIME Travel! 👉 Click here
😄Enjoy a more convenient trip to Japan with NAVITIME eSIM!👉Click here
👉Book Hotels & Ryokan on JAPANiCAN🏨

Latest Information and Updates for Visit Japan Web in 2026
First, let’s check the main features of Visit Japan Web as of 2026, as well as the latest updates regarding airport facilities and the tax-free system.
Immigration and Customs Declaration QR Codes Now Combined into One
Previously, separate QR codes were issued for "immigration" and "customs declaration," but now they have been combined into a single code. This means you no longer need to switch screens multiple times at airport counters or gates, making the process more intuitive.
List of Airports with Shared Kiosks and Electronic Customs Declaration Gates
Shared kiosks (electronic declaration terminals) have been installed inside the immigration areas of Narita International Airport Terminal 3, Haneda Airport, Kansai International Airport, and Fukuoka Airport. These facilities allow you to provide all the information needed for both immigration and customs declaration at once. In addition, electronic customs declaration terminals and gates are available at seven airports: New Chitose, Narita, Haneda, Chubu, Kansai, Fukuoka, and Naha.
What is Visit Japan Web? Is Pre-registration Required?
If you have heard of Visit Japan Web but are not sure if you need it, here is a summary of the service and its necessity.
A Free Service for Pre-registering Information Required for Entry into Japan
Visit Japan Web is a free web service that allows you to pre-register the information required for entry into Japan. Since you can enter the information needed for quarantine (health status confirmation), immigration, and customs declaration in advance, you no longer have to struggle with filling out paper forms with a pen on a shaky airplane tray table.
If You Do Not Register, Use Paper Immigration and Customs Forms
Even if you do not use Visit Japan Web, foreign travelers can still complete procedures using the paper "Disembarkation Card for Foreigners," and those entering or returning to Japan can use the paper "Declaration of Accompanied and Unaccompanied Articles." Using Visit Japan Web is optional.
However, the Japanese government has announced plans to abolish paper forms and fully digitize the procedures by 2030.
[Caution] How to Spot Fake Sites and Scam Apps
Unfortunately, there have been cases of fake sites pretending to be official government services in order to steal credit card information, as well as unofficial paid apps. Visit Japan Web is a completely free service. Please use the official login page (https://www.vjw.digital.go.jp/) and do not enter your credit card information on any site or app that asks for it.
What to Prepare and the Best Timing for Registering with Visit Japan Web
To complete your registration smoothly, here is what you should have ready and the best timing for registration.
Checklist of Required Documents and Information Before Registering
To make the input process smoother, have the following information ready in advance:
- Passport
- Flight ticket (something that shows your flight number)
- Accommodation information in Japan (postal code, address, facility name, phone number)
- Email address
When Can You Register?
You can create an account in advance. Register your travel plans after your flight and accommodation in Japan are confirmed, and complete your input before departure for a smoother process. If your flight or accommodation changes after registration, please update your information before entering Japan.
[With Images] How to Register for Visit Japan Web and Example Entries
Here, we will explain the actual procedures step by step. Let’s proceed while referring to the instructions on the official website.
Step 1: Create an Account and Log In
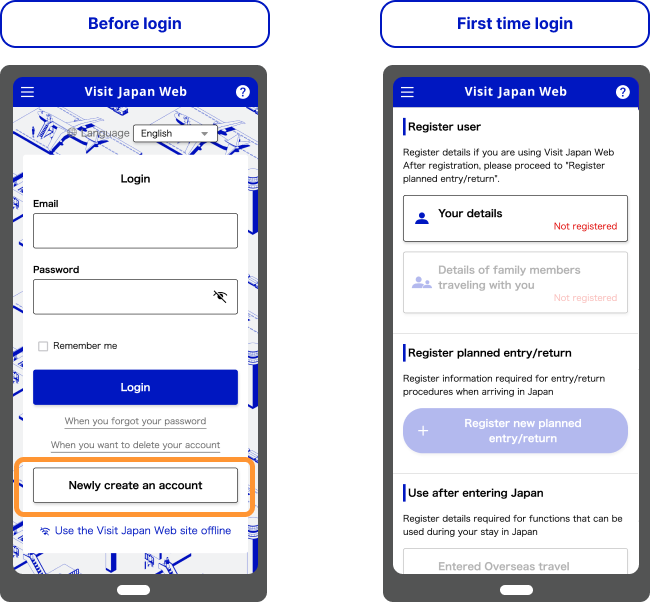
Access the official website and first create an account using your email address. A confirmation email will be sent to the registered email address, so complete the verification and log in.
Step 2: Register Your Personal Information and Accompanying Family Members
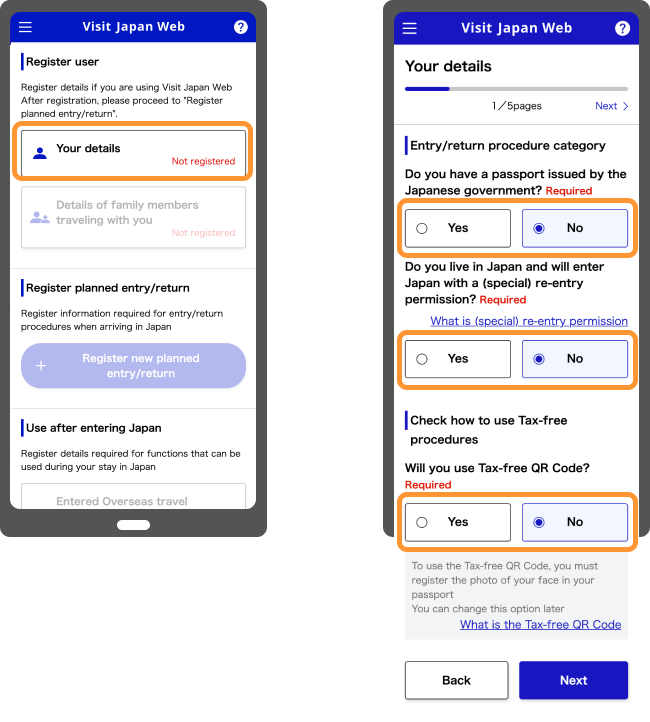
Register your passport information under “Personal Information.” You can choose to scan it with your camera or enter it manually, but if you want to use the duty-free shopping feature described later, scanning your passport with your camera is required so please be aware of this point.
Step 3: Register Your Entry/Return Schedule to Japan
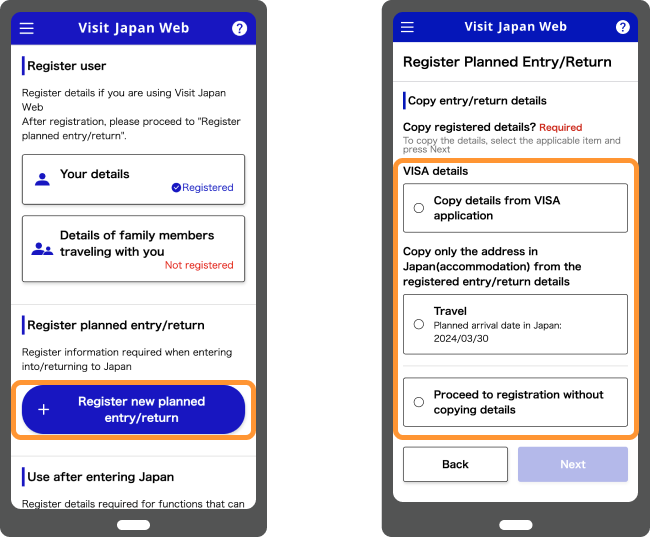
From “Register Entry/Return Schedule,” enter the trip name (for example: 2026 Tokyo Trip), estimated date of arrival in Japan, port of departure, airline name, and flight number. If you have a connecting flight, enter the information for the final flight arriving in Japan.
Step 4: Enter Your Accommodation Information in Japan
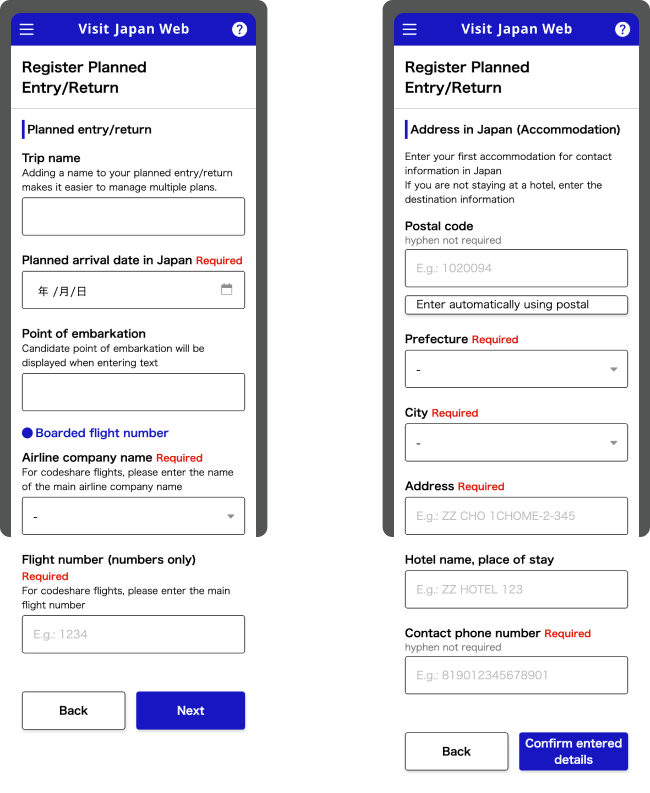
Depending on your accommodation, refer to the following examples and enter the information correctly.
All information must be entered in the Roman alphabet, so for addresses and other details, it is convenient to use the official spelling in the Roman alphabet by checking online or using AI, then copy and paste it.
Example for Staying at a Hotel
This is the most common case. Please refer to the hotel’s official website or your reservation confirmation email when entering the information.
- Postal code: 1111111
- Prefecture: TOKYO
- City/Ward: XX-CHO, XX-KU
- Street address: 1-1-1 XXXXX
- Hotel name/contact: Hotel FUNJAPAN / 0312345678
Example for Using Airbnb (minpaku)
For “minpaku” (private lodging), in addition to the property address, you must also correctly enter the “host’s name” and “property name.”
- Postal code: 2222222
- Prefecture: TOKYO
- City/Ward: XX-CHO, XX-KU
- Street address: 2-2-2 XXXXX FUNJAPAN MANSION101
- Hotel name/contact: Airbnb Shinjuku (or host’s name) / 09012345678 (host’s phone number)
Example for Staying at a Friend’s or Acquaintance’s House
When staying at a friend’s house, you do not need to enter your friend’s name, but be sure to include the phone number.
- Postal code: 3333333
- Prefecture: TOKYO
- City/Ward: XX-CHO, XX-KU
- Street address: 3-3-3
- Hotel name/contact: FRIEND'S HOUSE (no need to enter your friend’s name) / 0612345678 (friend’s phone number)
Step 5: Enter Immigration and Customs Declarations
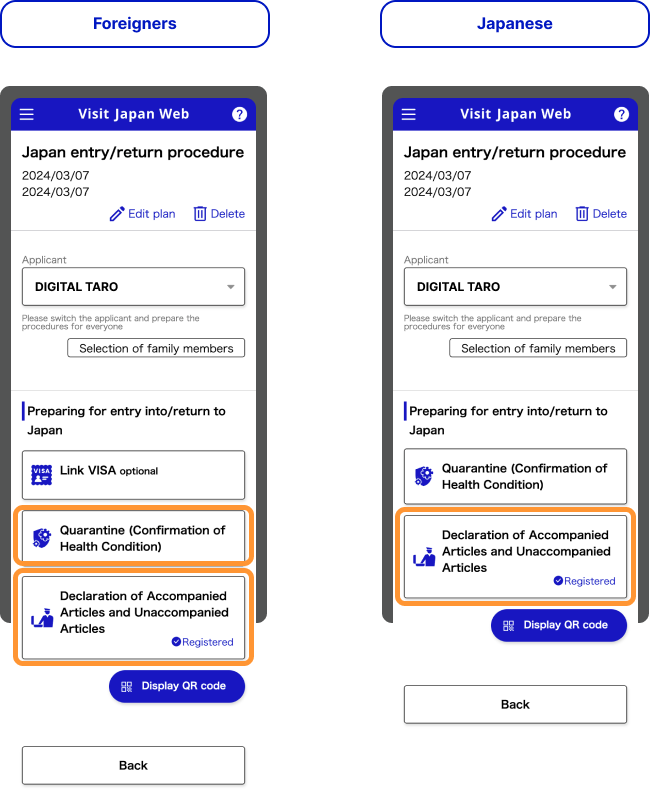
Select the registered schedule and proceed to answer the questions under the “Quarantine (health status confirmation)” and “Immigration and Customs Declaration” menus.
- Quarantine: Answer questions about your current health condition.
- Immigration/Customs: Answer questions about whether you have any prohibited items or items exceeding the duty-free allowance.
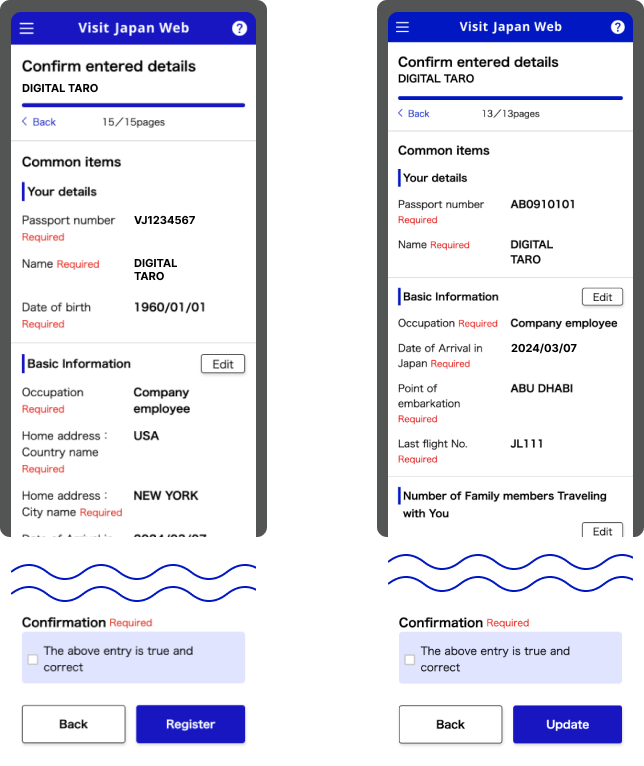
When traveling with your family, you can enter customs declaration information for accompanying family members all at once. However, a separate QR code will be issued for each person, and as a general rule, procedures at shared airport kiosks or electronic customs declaration terminals must also be completed individually.
Step 6: How to Issue and Save the Immigration and Customs QR Code
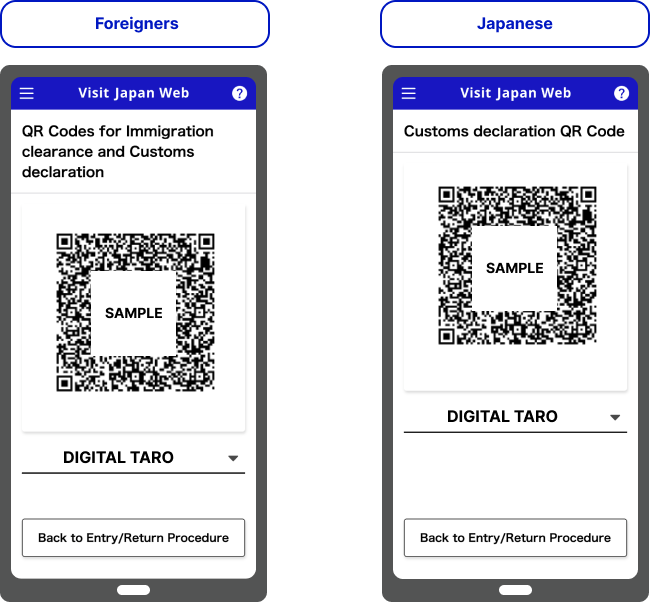
Once you have finished entering all the information, a QR code for immigration screening and customs declaration will be displayed. You can use a screenshot of this QR code, but if you make any changes to your registration details, be sure to save it again. You can also prepare for offline use of Visit Japan Web. The QR code can be used for both immigration screening and customs declaration, but it does not serve as a substitute for your passport, so be sure to carry your actual passport with you at all times.
A video is also available that explains the process for using the system for immigration procedures, so please refer to that as well.
- Digital Agency: Visit Japan Web "How to Use" https://services.digital.go.jp/visit-japan-web/guide/
Source: Digital Agency, Japan (https://services.digital.go.jp/)
How to Register When Traveling to Japan with Your Family
When traveling as a family, it can be a hassle for each person to create their own account. Here, we explain a convenient feature that allows a representative to register all family members together.
Family Members Who Can Be Registered as Accompanying Family and QR Codes for Children
Up to 10 family members traveling together for entry or re-entry procedures can be registered as "accompanying family" under the representative's account. A separate QR code will be issued for each accompanying family member, so please present each person's QR code in turn at the airport.
How to Complete Customs Declarations for the Whole Family and Important Points
You can enter customs declaration information for accompanying family members all at once, but as a general rule, procedures at shared kiosks, electronic customs declaration terminals, or gates must be completed individually. Shared kiosks cannot be used by people under 135 cm in height. At regular electronic customs declaration gates, children under 100 cm in height should go through together with their family.
How to Use the System at the Airport After Arriving in Japan and the Immigration Procedure Flow
Let’s take a look at what actually happens from the time you get off the plane until you leave the airport.
Basic Steps from Arriving at the Airport to Passing Through the Immigration Gate
- Quarantine (health status confirmation): Answer the questions on Visit Japan Web before departure and check the guidance according to your health condition. At the airport, follow the instructions of the staff as needed.
- Immigration Screening: At airports with shared kiosks, scan your QR code and passport at the shared kiosk in the immigration inspection area. Otherwise, present your passport and QR code at the immigration screening counter.
- Baggage Claim: After immigration screening, collect your checked baggage. Shared kiosks are located in the immigration area before baggage claim, not in the baggage claim area.
- Customs: If you have completed the procedure at a shared kiosk, follow the instructions displayed on the screen. Otherwise, use the QR code at the electronic customs declaration terminal or at a staffed inspection counter in the customs inspection area. Depending on your declaration, you may be subject to inspection by customs officers.
Smooth Procedures at Airports with Shared Kiosks
At Narita International Airport Terminal 3, Haneda Airport, Kansai International Airport, and Fukuoka Airport, scan your QR code and passport at the shared kiosk in the immigration area and follow the instructions for identity verification and other procedures. After completing the procedures, foreign travelers will undergo immigration screening at a booth for shared kiosk users, and at customs, proceed along the route displayed on the screen. Please check the official website for the latest information on which terminals and times are covered.
Visit Japan Web’s Tax-Free QR Code Feature and Important Points
For travelers who want to enjoy shopping, the tax-free feature is extremely convenient. Here, we will also touch on the system changes scheduled for the latter half of 2026.
How to Create a Tax-Free QR Code and How to Use It When Shopping
At stores that support tax-free QR codes, you can complete tax exemption procedures by presenting the QR code from Visit Japan Web instead of showing your physical passport. At stores that do not support this system, you will need to present your actual passport. To use this service, in addition to scanning your passport when registering your personal information, you must also scan the “Landing Permission Seal” QR code after entering Japan using the Visit Japan Web screen.
Tax-Free QR Codes Cannot Be Used as Screenshots
Unlike the QR codes for immigration and customs, the QR code for tax-free procedures cannot be used as a screenshot. Please be sure to display and present it directly from the Visit Japan Web screen. Once you have displayed the tax-free QR code online, you can re-display it offline within its validity period.
[Important] Changes to the Tax-Free System for Purchases from November 1, 2026
Starting in November 2026, Japan’s tax-free system is scheduled to gradually shift from the current “immediate discount” method to a “refund system” where you pay the consumption tax at the time of purchase and receive a refund when you leave the country. The functions of Visit Japan Web are also expected to be updated accordingly, so please keep an eye out for the latest information.
Frequently Asked Questions and Troubleshooting for Visit Japan Web (FAQ)
Here are solutions to common issues you may encounter while using the service. Knowing these typical cases in advance will help you feel more at ease.
Q. What should I do if I do not receive the confirmation email or forget my password?
A. Please check your spam or junk mail folder. If you have forgotten your password, you can reset it from the “Forgot Password” option on the login screen.Q. What should I do if there is an error when scanning my passport with the camera?
A. Please take the photo in a well-lit area and avoid any glare or reflections. If you are only using the service for immigration and customs declaration, you can choose to “enter the information manually.” However, if you wish to use the tax-free QR code, you must scan your passport with the camera.
Q. What if my flight or hotel changes after registration?
A. After logging in, you can edit your registered schedule at any time to update your information.
Q. What should I do if I cannot connect to Wi-Fi at the airport?
A. You can save a screenshot of the QR code for immigration and customs in advance. You can also add Visit Japan Web to your device’s home screen and prepare for offline use. The tax-free QR code cannot be used as a screenshot, but if you have displayed it online once, you can re-display it offline within its validity period.
Q. What should children or elderly people who do not have a smartphone do?
A. Register them as “accompanying family members” under the representative’s account, and present each person’s QR code in turn using the representative’s smartphone.
Q. Can Japanese nationals use this service when returning to Japan?
A. Yes, it is available. Japanese nationals do not need to register for immigration, but by completing “Customs Declaration” on Visit Japan Web, you can use the electronic gates for a smoother return.
Summary: Complete Pre-Registration and Enjoy a Smooth Stay in Japan
If you pre-register the necessary information on Visit Japan Web, you may be able to proceed smoothly through immigration and customs at supported airports. With just a little preparation before departure, you can enjoy more of your wonderful time in Japan.
Pre-Departure Checklist:
✅ Create a Visit Japan Web account
✅ Register information for yourself and any accompanying family members
✅ Enter your arrival schedule and procedure information
✅ Check that your immigration and customs QR codes are displayed, save screenshots or prepare for offline use
✅ Don’t forget your physical passport
🚅Book your Shinkansen ticket with NAVITIME Travel! 👉 Click here
🛫Book your flight ticket with NAVITIME Travel! 👉 Click here
😄Enjoy a more convenient trip to Japan with NAVITIME eSIM!👉Click here
👉Book Hotels & Ryokan on JAPANiCAN🏨







Comments