Wearing a Japanese kimono seems very difficult at first glance, but basically, it is the same as putting on an overcoat and fastening with a belt. If you carefully fold even the finest parts or wrap it around your body while adjusting the length, the effect will be beautiful.
The Preparation Must Start the Day Before: 3 Things You Should Do
Since the kimono is folded up when not in use, it will have wrinkles on the fabric. It also takes time to put it on properly. So let's do what can be done in advance from the day before it's actually going to be worn.
1. Put it on a hanger
In order to smooth out wrinkles caused by folding, hang the kimono on a hanger one day before wearing. Ideally, the room should not be exposed to direct sunlight. If you can't remove the wrinkles, put a plain white cloth over the spot and iron from the back at a low temperature. If the cloth is a colored, it may stain the kimono with the heat of the iron.
2. Attach a decorative collar (半衿 Han-eri)
Attach a han-eri (decorative collar) to the collar of the kimono. Also, make sure you have the obi and all the accessories to match the garment. It is difficult to search for small items once you are wearing a kimono, because you have limited physical movement, so make sure you have found everything beforehand.
3. Clean the area where you will change into the kimono
In Japan, in order to prevent the kimono from being dragged on the floor or tatami mats when it is being put on, a large piece of washi paper called Ishoshiki (衣裳敷) is spread on the floor, and then the kimono is placed on top of it. You can also use Picnic sheets and vinyl sheets as an alternative. If you don't have either, clean the space you are using as a dressing room.
5 More Steps Before Putting on a Kimono

Perhaps surprisingly, the first thing you should do when you wear a kimono is to put on tabi (足袋 split-toe socks). It's very difficult to touch your toes after putting a kimono on and tying the obi. Let's teach run through the unexpected order of the method of dressing in a kimono.
STEP 1: Put on tabi
First, hold the tabi as if you are putting on a pair of socks. Then, fold the tabi halfway inside-out (just the heel and the sole, keep the tips in original shape) to make it easier to put your feet in. Once you've put your feet in, pull the tabi around your feet and fasten the hooks on your heel and the back of your ankle.
STEP 2: Put kimono underwear on
Put on the undergarments called “Hadajuban” (肌襦袢) and “Susoyoke” (裾よけ). They come as a one-piece type, a slip type, and separate type of underwear for women's kimono, so choose the one that suits you best. Choose seamless bras and underwear of the kind you wear on a daily basis.
STEP 3: Make adjustments
For women, to wear your kimono beautifully, the curve in at waistline should be eliminated so the entire body is molded into a tubular shape. To achieve this effect, wrap a towel around your waist.
STEP 4: Wear Nagajuban
Wear Nagajuban (長襦袢 long inner garment), hold each end of collar in front of your body with both hands, and align them so that the center of the collar is correctly at the center of the nape of your neck. When the centers are aligned, hold both ends of the collar together with your left hand and pull the collar back with your right hand a little. It's beautiful when the space between the collar and the neck is about the width of your palm. Then wrap the garment around your body with the left-hand cloth passing over the right. (right-in left-out).
Adjust the length of the nagajuban's hem to be slightly shorter than the kimono itself. It is not considered polite if the nagajuban's hem appears below the hem of the kimono. The color of the nagajuban is usually white or pale.
STEP 5: Fasten with Date-jime
While holding the nagajuban wrapped around your body with one hand, wrap the date-jime (伊達締め - inner belt) around and fasten it. It is OK to use a bow-knot to tie it. Be sure to fasten it firmly so that the nagajuban will not lose its shape. At this time, it is okay if there are wrinkles or the garment is not straight. If you do the following three points, you will get it beautifully done.
- Pulling the center of the back: In STEP 4 above, the collar should be pulled apart from the neck to leave a roughly one palm's-width gap. Do it again to ensure the correct shape.
- Straighten left and right wrinkles: Pull the sleeves evenly.
- Pull down the slack on the chest: pull down on the part of the kimono that is below the date-jime to eliminate any slack in the cloth around the chest.
FINALLY! How to Put On a Kimono
It may be difficult at first, but with some practice, anyone can do it.
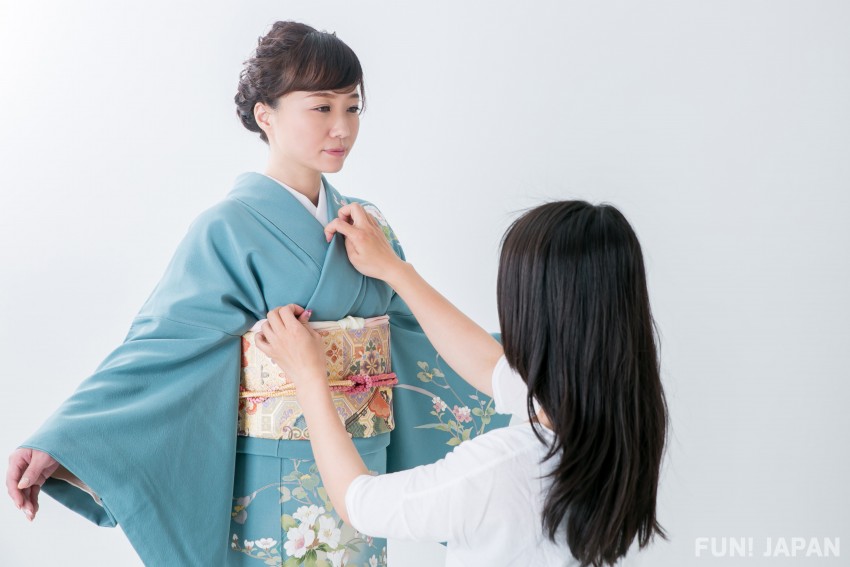
STEP 1: Slip your arms through the sleeves of the kimono
After slipping your arms into the the sleeves of the kimono, hold each end of collar in front of your body with both hands, and align them so that the center of the collar is correctly at the center of your nape of the neck. This is similar to STEP 4 when putting on the nagajuban. Wear it so that the kimono collar is exactly aligned outside the collar of the nagajuban.
Then, lift the hem parallel to the ground and adjust it to get the the length close to the floor.
STEP 2: Wrap kimono around your body
Drape the kimono collar in your left hand to the right side of your waist to determine the width at the front. Widen the front to get the width you decided, and wrap the cloth you have in your right hand around your body first. Lift the tips of the hem up by 7-8 cm from the ground. Then wrap the part that will overlap (the part of the kimono in your left hand) around your waist and lift the tips of the hem by 3 to 4 cm from the ground, and press the top of the hip bone with your right hand to keep the kimono firmly in place.
*Adjust the length of the hem to be just above the ground to make it beautiful.
STEP 3: Tie the Koshihimo and make an Ohashori
While holding the kimono with your right hand, tie the Koshihimo (腰紐 waist cord) and fasten the kimono. It is OK to use a bow-knot for this.
Once the kimono has been secured, next make an Ohashori (おはしょり). Ohashori is the fold in the kimono to ensure that the kimono is the right length that can be seen just below the obi. The ohashori is key to achieving the beautiful effect of the proper proportion of the kimono to the length of the wearer's body.
STEP 4: Fasten with Date-jime
Wrap the date-jime around the waist and tie it with a knot. Once again, it is OK to use a bow-knot. Check that the ohashori is proportional to the body and make adjustments to correct it.
How to Tie a Kimono with Obi

There are multiple types of obi knot, such as double taiko knot (二重太鼓結び), single taiko knot (一重太鼓結び), kakudashi knot (角だし結び), Ginza knot (銀座結び), tateya knot (立て矢結び), hana-ryusui-ya knot (花流水矢結び), flower knot (花結び), cho-bunko knot (蝶文庫結び), and fukura-suzume knot (ふくら雀結び). Also, when tightening the obi, it is always a good idea to pull it tight each time it passes around your body.
The Finish Touch is Small Decorative Items

Basically, when it comes to "wearing a kimono", once you have put on your kimono, obi and tabi, you are pretty much done, but if you have the following, it just finishes it off to perfection.
- Folding fan (扇子 Sensu): Insert it, handle down, between the obi and the obi-age on the left side of the body. Like a sword, it points slightly diagonally from the center of the body to the sides. About 2cm of the tip of the fan should be visible.
- Hair ornaments: It's easy and simple to put a hairpin in a Yakai-maki (夜会巻き French roll hairstyle). There are many other hairstyles and decorations.
- Zori: The higher the the base, the higher the formality. Also, the lighter the color, the more suitable it is for a sunny location.
- Bag: a small enamelled on fits perfectly. It could be a clutch bag. Matching the colors of the kimono and obi with the color of the bag gives a uniform look to the whole body.
- Umbrella: Whether it is a parasol or a rain umbrella, it is best to use a traditional Japanese one.
What do you think? Practice putting on a kimono to take pictures or go out and enjoy!
Comments